

[ad_1]
For those who’re searching for find out how to Homebrew 3DS handhelds for the New 3DS, New 3DS XL, and New 2DS XL which have firmware model 11.17.0 and are from the EUR, JPN, and USA areas, you’ve positively come to the appropriate place. On this information, we’ll be breaking down find out how to hack your 3DS for model 11.17.0.
Observe: 3DS firmware 11.17.0 is probably the most just lately launched model for the Nintendo 3DS. There are a lot of system variations accessible, so be sure to have 11.17.0 put in.
We don’t condone piracy or downloading ROMs illegally. Earlier than you do any tinkering along with your 3DS, remember to test relevant legal guidelines for the place you reside to make sure you’re not doing something you shouldn’t be.
Vital disclaimer: We is not going to be held accountable if something goes unsuitable whereas following this information. For those who comply with the instruction specified by it accurately, you shouldn’t have any issues, nonetheless exceptions do happen. This information is just for New 3DS, New 3DS XL, and New 2DS XL techniques – should you should not have considered one of these, this information is not going to work on your 3DS.
It’s unusual for 3DS techniques to be bricked utilizing the newest strategies accessible, nonetheless you need to know the dangers related to hacking your 3DS earlier than you attempt. Additionally, should you do select to hack your 3DS, be weary of taking part in video games on-line as a result of there’s a probability Nintendo may find yourself banning you in the event that they understand you’re on a hacked 3DS.
What Is Customized Firmware?
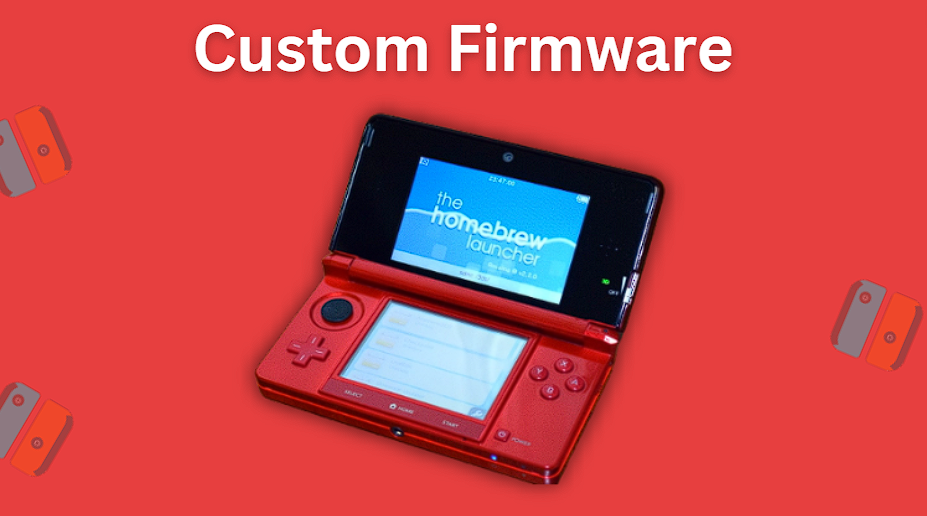
Customized Firmware is a software program modification that you simply set up onto your 3DS system, permitting you to do something that the 3DS is able to. Nintendo’s firmware by default has sure safeguards in place that forestall sure actions from with the ability to happen. By putting in customized firmware, you’re enabling your 3DS to do different actions which might be required with the intention to homebrew it.
The next is a listing of typical makes use of for customized firmware:
- Putting in and operating the homebrew launcher to play video games
- Getting round area locked titles which might be sure to particular areas of the world
- Having the ability to customise the 3DS residence display and set up customized themes and badges
- Skill to play ROM hacks
- Edit your save knowledge administration and your backup information
- Skill to emulate video games from different techniques and allow taking part in Nintendo DS and Gameboy Advance video games
- Skill to put in video games out of your bodily video games immediately onto your 3DS console
What We’ll Be Putting in In This Information
All through this information, you’ll be putting in a few various things:
- Boot9strap: a modified firmware that makes use of Sighax and a vulnerability within the console’s NDMA engine to achieve code execution entry (sounds complicated, but it surely’s actually not)
- Luma3DS: a program that patches the system software program for New 2DS and 3DS handhelds
- Different homebrew software program just like the package deal installer, save file supervisor, and the homebrew launcher app retailer
- Additionally, just be sure you have a spare SD card mendacity round that you may overwrite the information on
Getting Began
First we’ll have to test our 3DS to see if any customized firmware has beforehand been put in.
1. Checking Your 3DS for Customized Firmware
- Flip your 3DS off fully
- Whereas holding down the Choose button, flip your 3DS again on with the Choose button nonetheless held down
- For those who don’t see any menu popup, you’re good to go and may proceed to part 3 beneath – should you do see a menu popup, this implies your 3DS already has customized firmware put in and also you’ll need to improve your firmware to probably the most trendy one
2. Upgrading your Customized Firmware
For those who don’t have any customized firmware already put in in your 3DS, you’ll be able to skip this part and soar right down to part 3 beneath. For those who do have customized firmware put in (arm9loaderhax or boot9strap), learn on as a way to improve it and proceed the information.
- Flip off your 3DS fully
- Maintain down the Choose button and switch the console on with the Choose button held down
- You must see a menu pop up
The following steps will depend upon which model of customized firmware you’ve put in.
Luma Model 7.0.5 or Decrease
For those who see a Luma3DS model of seven.0.5 or decrease:
- First, obtain the next information (for magnet information it is advisable to use a torrent consumer like qBittorrent or Deluge, they’ll begin with magnet:):
New 3DS Customers Solely: secret_sector.bin (magnet hyperlink)The newest launch of Luma3DS (the Luma3DS .zip file)The v7.0.5 launch of Luma3DS (direct obtain)The newest launch of SafeB9SInstaller (direct obtain)The newest launch of boot9strap (direct obtain) - Now that you’ve the above information downloaded in your laptop, flip off your 3DS fully (you’ll be overwriting any present information in your SD card)
- Insert your SD card into your laptop
- Copy the boot.agency and boot.3dsx information from the newest model of the Luma3DS .zip file that you simply downloaded to the basis listing of your SD card
- Now copy arm9loaderhax.bin from the v7.0.5 Luma3DS .7z file to the basis of your SD card
- You’ll additionally want to repeat SafeB9SInstaller.bin fromt he SafeB9SInstaller .zip to the /luma/payloads/ folder in your SD card (If both the luma or payloads folders don’t exist already in your reminiscence card, you’ll have to create them)
- Test your SD card for every other .bin payloads within the /luma/payloads folder in your SD card and be sure to delete them (for instance: GodMode9.bin, Decrypt9WIP.bin, and so forth)
- Subsequent, create a folder named boot9strap in your SD card’s root listing
- You’ll now need to copy boot9strap.agency and boot9strap.agency.sha from the boot9strap .zip to the /boot9strap/ folder in your SD card
- Now copy secret_sector.bin to the /boot9strap/ folder in your SD card
- Take away your SD card out of your laptop and put it again into your 3DS
- Maintain down the Begin button whereas turning in your 3DS to launch SafeB9SInstaller (For those who see the Luma configuration display as an alternative of SafeB9SInstaller, press the Begin button and shut down your 3DS to attempt once more to refresh it)
- Let all the security checks full
- When the display prompts you to take action, add the important thing combo proven on the highest display to put in boot9strap
- After set up has full, press the A button to restart your 3DS
- Your console ought to now restart intot he Luma3DS configuration menu
- Press the Begin button to avoid wasting and restart
Luma Model 7.1
For those who see a Luma3DS model of seven.1:
- Obtain the next information:
The newest launch of SafeB9SInstaller (direct obtain)The newest launch of boot9strap (direct obtain)The newest launch of Luma3DS (the Luma3DS .zip file)
- After you’ve downloaded the above information, insert your SD card into your laptop (you’ll be overwriting any present information on this SD card)
- Create a folder known as boot9strap within the SD card’s root listing
- Copy boot9strap.agency and boot9strap.agency.sha from the boot9strap .zip to the /boot9strap/ folder in your SD card
- Copy SafeB95Installer.agency from the SafeB95SInstaller .zip to the basis listing on yoru SD card and rename it to boot.agency
- Now go forward and take away your SD card out of your laptop and put it into your 3DS that’s turned off
- Flip your 3DS on (you need to see it launch SafeB9SInstaller)
- When requested, put in the important thing combo proven on the highest display to put in boot9strap
- As soon as it finishes, maintain down your 3DS energy button to show the console off once more
- Take away your SD card out of your 3DS and put it again into your laptop
- Copy boot.agency and boot.3dsx from the Luma3DS .zip to your SD card’s root listing (you’ll substitute any present information)
- Take away your SD card out of your laptop and now put it again into your 3DS
- Flip your 3DS on and when it boots into the Luma 3DS configuration display, press the Begin button to avoid wasting and restart your 3DS
Luma Model 8.0 or larger
For those who see a Luma3DS model of 8.0 or larger:
First ensure that your SD card you’re utilizing is formatted as FAT32 (if it’s not, it received’t be appropriate along with your 3DS)
- First head over to this hyperlink and obtain the Luma3DS .zip file
- Now insert your SD card into your laptop and replica boot.3dsx and boot.agency from the Luma3DS .zip to your SD card’s root listing (substitute any already present information on the SD card)
- Take away your SD card out of your laptop and put it into your 3DS
- Flip your 3DS on and as soon as the Luma3DS configuration menu seems on display, press the Begin button to avoid wasting and restart your 3DS
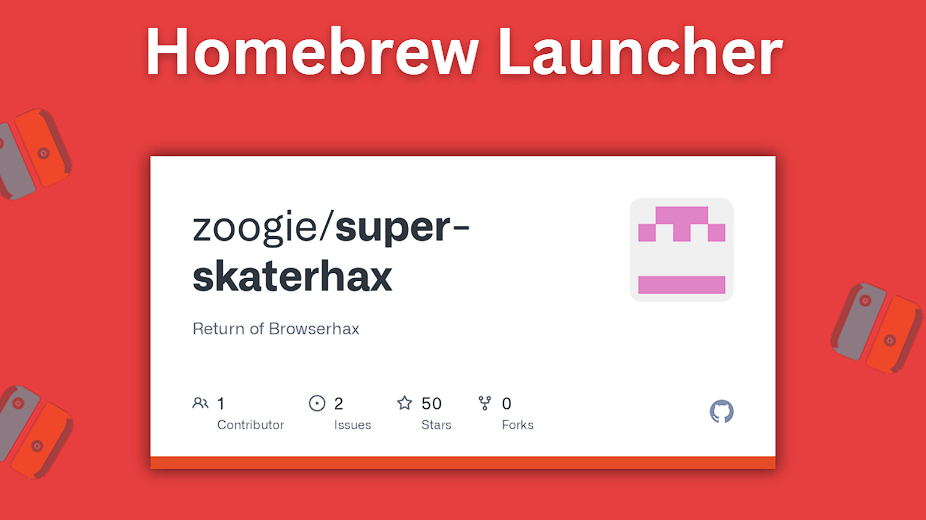
3. Putting in The 3DS Homebrew Launcher Tremendous-Skaterhax
First you’ll have to be sure to have downloaded the next information:
- The newest launch of Luma3DS (the Luma3DS .zip file)
- The newest launch of super-skaterhax (the discharge .zip file)
As soon as the above information are downloaded in your laptop, now you can start:
- Flip off your 3DS fully and insert your SD card into your laptop
- Copy boot.agency and boot.3dsx from the Luma3DS .zip to your SD card’s root listing
- You’ll want to copy every little thing contained in the folder on your 3DS’s area (and in addition system model in case your area is USA) within the super-skaterhax .zip to your SD card’s root listing
- Take away your SD card out of your laptop and place it in your 3DS
- Flip your 3DS on
- Open up your 3DS’s net browser and kind the next URL in manually: https://zoogie.github.io/net/tremendous
- Press the Choose button or faucet the Star icon on the display to open the bookmark tab and select Bookmark this web page
- Press the B button to return to the 3DS browser after which press the Begin button to open the context menu
- Faucet Settings, then Delete Cookies, after which press the A button to proceed
- Press the House icon to return the House menu and instantly press the A button to launch the browser once more
- Choose the GO GO! button that you simply see on the highest display (if any prompts seem, remember to approve all of them)
- If profitable, your 3DS ought to boot into the homebrew Launcher
- Now you can flip off your 3DS
4. Putting in Boot9strap HBL-USM
First just be sure you have the next downloaded in your laptop:
Now we’ll be copying the required information we have to allow the unSAFE_MODE exploit on our 3DS’s SD card. After that, we’ll go forward and use the Homebrew Launcher to launch slotTool and overwrite our Wi-Fi slots with hacked knowledge. Understand that your 3DS’s Wi-Fi connections can be briefly overwritten whereas the exploit is energetic.
- Go forward and insert your SD cart into your laptop
- Create a folder named boot9strap in your SD card’s root listing
- Copy boot9strap.agency and boot9strap.agency.sha from the RELEASE .zip into the /boot9strap/ folder in your SD card
- Now go forward and create a folder and title it 3ds on the basis of your SD card should you don’t have already got one there (that is totally different than the Nintendo 3DS folder that the console routinely generates – this may retailer homebrew apps and knowledge)
- Copy slotTool.3dsx from the slotTool folder contained in the RELEASE .zip into the /3ds/ folder in your SD card
- Now copy usm.bin from the RELEASE .zip to the basis folder on the SD card
- Additionally copy SafeB9SInstaller.bin from the SafeB9SInstaller .zip onto your SD card’s root listing
- Now go forward and take away your SD card out of your laptop and put it again into your 3DS
- Flip your 3DS on and open up the Homebrew Launcher by visiting your Web Browser
- Choose slotTool from the checklist of homebrew to launch it after which choose the INSTALL exploit to wifi slots 1,2,3 & shutdown choice (some textual content will present in your display after which the system ought to shut down)
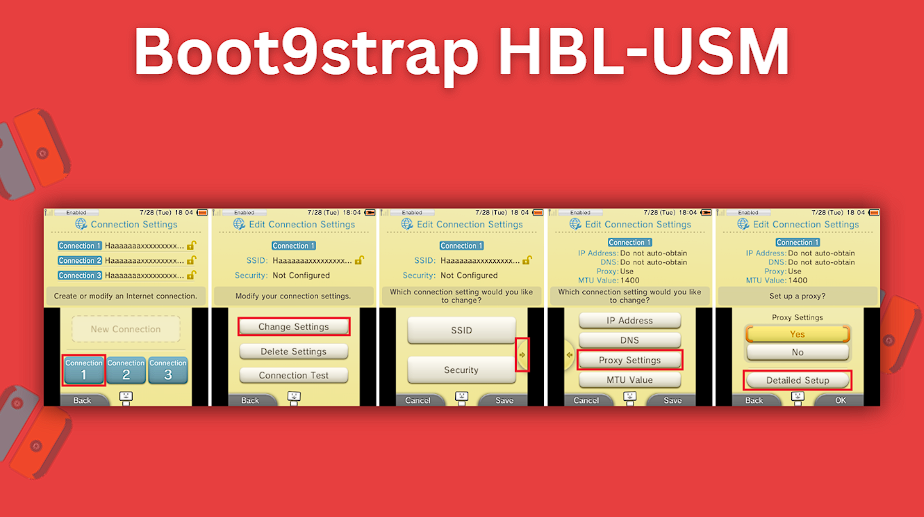
We’ll now be coming into Protected Mode and navigating to a menu to set off unSAFE_MODE which can launch the boot9strap installer.
- Make sure that your 3DS is turned off and maintain down the next buttons: Left Shoulder + Proper Shoulder + Up (D-Pad) + A (button) and whereas holding all of those buttons down on the identical time, flip your 3DS on – remember to maintain holding all of those buttons down till the console boots up into Protected Mode
- Press the OK button to simply accept the replace (there received’t truly be any replace to put in)
- Choose I settle for to simply accept the phrases and circumstances
- The replace ought to fail and present an error code on display 003-1099 (that is anticipated and regular)
- If you find yourself requested Would you wish to configure Web settings? remember to choose Sure
- Now head to Connection 1 > Change Settings > Subsequent Web page (press the appropriate arrow) > Proxy Settings > Detailed Setup
- Your console ought to now boot into SafeB9SInstaller
Now we’ll set up customized firmware onto our 3DS.
- If you get requested, enter the important thing combo proven on the highest display to put in boot9strap
- After it finishes, press the A button to restart your 3DS
- Your 3DS ought to boot up into the Luma3DS configuration menu (go forward and depart these choices to the default settings and don’t test or uncheck any of them)
- Press the Begin button to avoid wasting and restart your 3DS
- Your 3DS ought to now boot immediately into Luma3DS by default (bear in mind, Luma3DS doesn’t visually look any totally different from the conventional House Menuso if it boots into the House Menu, it must be operating the customized firmware as anticipated)
We’ll now go forward and restore the Wi-Fi profiles on the 3DS.
- Choose and launch the Obtain Play software
- Wait till the 2 buttons seem (don’t press both of those buttons)
- Press Left Shoulder + Down (D-Pad)b + Choose all on the identical time to open the Rosalina menu
- Select Miscellaneous choices after which choose Swap the hb. title to the present app
- Now press the B button to proceed after which once more press the B button to return to the Rosalina most important menu
- Press the B button once more to exist the Rosalina menu after which press House
- After that, shut Obtain Play after which relaunch the Obtain Play app
- Your 3DS ought to launch the Homebrew Launcher
- Choose to launch slotTool from the checklist of Homebrew
- Choose RESTORE unique wifi slots 1,2,3
- Your console will restart and your Wi-Fi slots must be restored
5. Finishing Setup
We’re now on the ultimate part of this information. We’ll be making some system file backups and putting in some extra homebrew applications.
You’ll want to first set up the next:
After you’ve downloaded all the above, you’ll be able to proceed:
- Flip off your 3DS fully and in addition insert your SD card into your laptop
- Create a folder within the root listing of your SD card known as cias should you don’t have already got one
- Copy all of the CIA information Anemone3DS.cia, Checkpoint.cia, FBI.cia, Homebrerw_launcher.cia, and Common-Updater.cia to the /cias/ folder in your SD card
- Now go forward and replica FBI.3dsx into the /3ds/ folder in your SD card
- Additionally create a folder named payloads contained in the luma folder in your SD card if it doesn’t have already got one there
- Now copy GodMode9.agency from the Godmode9 .zip into the /luma/payloads/ folder in your SD card
- Additionally copy the gm9 folder from the GodMode9 .zip to your SD card’s root listing
- Go forward and take your SD card out of your laptop and put it into your 3DS that’s now powered off
- Flip your console again on
Now we’ll be updating the 3DS to the newest model.
- Go to System Settings > Different Settings after which go all the way in which to the appropriate and choose System Replace (should you see a message that your system is updated, you’re good to go, in any other case replace your system)
We’ll now be briefly changing Obtain Play with the Homebrew Launcher which we’ll be utilizing to launch FBI. Don’t fear, Obtain Play can be accessible once more after restarting the 3DS as soon as we end.
- Launch the Obtain Play app
- Wait till you see the Nintendo 3DS and Nintendo DS buttons
- Press and maintain Left Shoulder + Down (D-Pad) + Choose all on the identical time to open up the Rosalina menu once more
- Now select Miscellaneous choices after which choose Swap the hb. title to the present app
- Press the B button to proceed after which press the B button once more to return to the Rosalina most important menu
- Press the B button once more to exit the Rosalina menu after which press House to droop Obtain Play
- At this level, press the Shut button on the underside display to shut out Obtain Play
- Now it is advisable to launch Obtain Play once more and your console ought to load up the Homebrew Launcher
Now we’ll be syncing the 3DS inner clock with the precise time and dumping the sound firmware required for some homebrew purposes to make use of sound accurately.
- Maintain the Left Shoulder button + Down (D-Pad) + Choose all on the identical time to open up the Rosalina menu
- Select Miscellaneous choices after which choose Dump DSP Firmware
- Press the B button to proceed after which choose Nullify person time offset
- Press the B button to proceed after which press the B button once more to return to the Rosalina most important menu
- Press the B button one final time to exit the Rosalina menu
We’ll now be putting in some helpful homebrew apps from the House Menu.
- Launch FBI from the checklist of homebrew
- Head to SD > cias
- Select <present listing>
- Select Set up and delete al CIAs and press the A button to verify your selection
- Now press House and shut Obtain Play
We’ll now be organising our 3DS to have the ability to entry a number of the Luma3DS’s information even when an SD card isn’t inserted.
- Flip off your 3DS console
- Press down and maintain the Begin button and switch off your 3DS to launch GodMode9
- For those who’re requested to create a necessary information backup, press the A button to do it after which press the A button once more to proceed after it finishes
- For those who’re requested to repair the RTC date&time, press the A button to do it after which press the A button to proceed as soon as it finishes
- Press House to carry up the motion menu after which choose Scripts…
- Select GM9Megascript after which select Scripts from Plailect’s Information
- Choose Setup Luma3DS to CTRNAND
- When requested, press the A button to proceed
- Press the A buttona acquire to unlock SysNAND (lvl1) writing after which use the important thing combo proven
- Press the A button once more to proceed
We’ll now be eradicating some unneeded information from our SD card
- Choose Cleanup SD Card and when requested, press the A button to go forward
- Press the A button once more to proceed after which press the B button to return to the principle menu
Now we’ll be making some backups of information that we will use sooner or later if we ever have to recuperate knowledge.
- Choose Backup Choices after which select SysNAND Backup
- Press the A button to verify (this may take some time so be affected person at this step)
- As soon as it finishes, press the A button to proceed after which press the B button to return to the principle menu
- Select Exit
- Press the A button to relock write permissions if requested
- Head to [S:] SYSNAND Digital and press the A button on Important.exefs to decide on it
- Select Copy to 0:/gm9/out (if it exhibits you that this already exists, press the A button to overwrite the information)
- Press the A button to proceed after which press House to carry up the motion menu
- Select Poweroff system to show off your 3DS
- Along with your 3DS nonetheless turned off, insert your SD card into your laptop
- Copy <date>_<serialnumber>_sysnand_##.bin, <date>_<serialnumber>_sysnand_##.bin.sha, and important.exefs from the /gm9/out/ folder in your SD card to a secure location in your laptop
- Copy these backups to a number of areas (corresponding to on-line file storage like Google Drive, an exterior exhausting drive that you’ve mendacity round, or some place else that you may entry sooner or later if it is advisable to)
- Delete <date>_<serialnumber>_sysnand_##.bin and <date>_<serialnumber>_sysnand_##.bin.sha from the /gm9/out/ folder in your SD card after copying it
- You probably have it in your SD card, copy the /luma/backups/ folder to a secure location in your laptop
- Put your SD card again into your 3DS and switch your 3DS again on
And identical to that, you’ve now efficiently accomplished the information and have hacked your 3DS!
Ceaselessly Requested Questions
How Do I Set up 3DS Video games Onto My System?
Putting in video games from 3DS recreation cartridges immediately onto your handheld is fairly easy. Assuming you’ve already adopted the steps on this information, you need to have already got your 3DS hacked. In that case, comply with the steps beneath.
- Press down and maintain the Begin button
- Whereas nonetheless holding down Begin, flip in your 3DS to launch GodMode9
- Head to [C:] GAMECART
- Press down the A button on [TitleID].trim.3ds to decide on it after which select NC0SD picture choices…, after which choose Set up recreation picture
- Press the A button to unlock SysNAND (lvl1) writing after which enter the important thing combo proven
- As soon as completed, your recreation will present up within the HOME Menu as an put in title
How Do I Dump 3DS Video games Onto My System?
- Press down and maintain the Begin button and whereas preserving it held down flip in your 3DS to start out up GodMode9
- Head to [C:] GAMECART
- Press the A button on [TitleID].trim.3ds to decide on it after which select NCSD picture choices… after which select Construct CIA from file
- The installable .cia formatted file can be output to the /gm9/out/ folder in your SD card for you
You may also get pleasure from this information on find out how to setup the Citra 3DS RetroArch core for PC & Steam or this text on the most effective 3DS emulator for PC & Android.
[ad_2]
Source link
